读完本文,你会知道:
- 缓存的基本概念
- spring 缓存抽象模型
- 如何使用 spring 缓存
- 如何扩展 spring 缓存
目录
@[toc]
概述
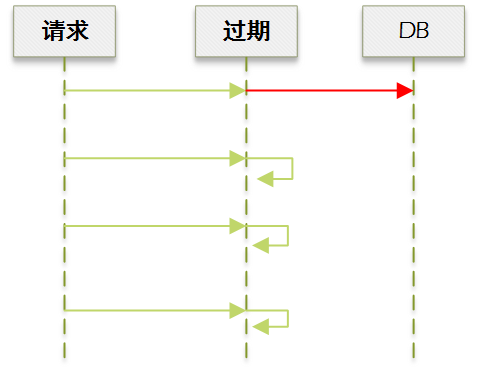
传统模式下,很多并发不大的系统都是直接将查询请求发到 DB:
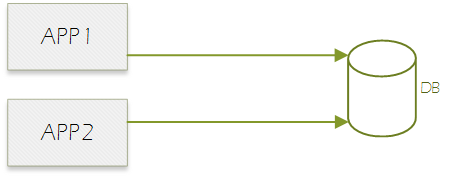
随着业务发展,业务逻辑会变得越来越复杂,系统并发数也会逐渐上涨,导致传递到 DB 的查询请求以几何级数上涨,DB 慢慢变得不堪重负。
为了应对这个问题,我们需要将常用的数据缓存起来,避免业务量*N的查询请求穿透到 DB。
根据刷新方式的不同,大体有两种方案。
方案 1-外部定时刷新

- 缓存刷新程序读取 DB,然后写入缓存;
- 联机交易直接读取缓存,不再访问数据库;
这个方案存在几个缺点:
- 需要特定缓存程序定期刷新。如果这个刷新动作出现问题,会产生大面积的参数变更不生效。
- 缓存数据格式死板。为了通用,格式必须跟 DB 表保持一致,应用层获取到之后还需要自行加工处理。
- 刷新频率无法精细控制。比如一些数据一天刷新一次即可,一些数据需要 10 秒刷新一次。
- 无法区分冷热数据,空间利用率差。比如一张表 10000 条数据,常被访问的也就 100 条,另外 9900 条数据可能一年都不会用到一次,还是一样被加载到缓存里面,冷数据不能根据 LRU 淘汰。
方案 2-访问自动刷新
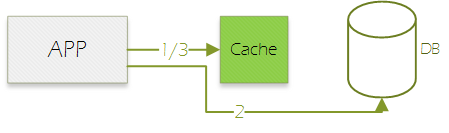
- 联机交易访问缓存,如果有值且未过期,直接返回调用者;
- 访问数据库获取最新值;
- 写入缓存,返回调用者;
因为方案1的种种问题,所以现在主流都是采样方案2。
demo 准备
接下来我们做个 demo,看看应该如何逐步实现并改进缓存方案。
需求:通过用户 id 查询用户 name
UserService-用户服务接口
接口只有一个方法getNameFromId,入参为用户 id,返回值为用户名:
public interface UserService {
    public String getNameFromId(String userId);
}
|
AbstractUserService-用户服务抽象类
提供一个方法模拟实现从 DB 查询,让子类可以直接调用:
public abstract class AbstractUserService implements UserService {
private Logger log = LoggerFactory.getLogger(getClass());
protected String getNameFromDb(String userId) {
log.info("db query: {}", userId);
try {
Thread.sleep(100);
} catch (InterruptedException e) {
throw new RuntimeException(e);
}
return "Name_" + userId;
}
}
|
testDirect - 测试方法
通过传入不同的实现来测试对应的缓存效果:
private void testDirect(UserService userSvc, String userId) {
String name;
name = userSvc.getNameFromId(userId);
log.info("result: {} -> {}", userId, name);
name = userSvc.getNameFromId(userId);
log.info("result: {} -> {}", userId, name);
name = userSvc.getNameFromId(userId);
log.info("result: {} -> {}", userId, name);
}
|
无缓存
无缓存版本直接调用父类方法访问 DB:
@Component
public class NoCacheUserService extends AbstractUserService {
    @Override
    public String getNameFromId(String userId) {
        return getNameFromDb(userId);
    }
}
|
执行后从输出可以观察到每次调用都是访问 DB:
db query: I0001
result: I0001 -> Name_I0001
db query: I0001
result: I0001 -> Name_I0001
db query: I0001
result: I0001 -> Name_I0001
|
原始缓存
程序员的第一想法肯定是不用搞那么多杂七杂八的,自己动手用 Map 实现一个缓存:
@Component
public class SimpleCacheUserService extends AbstractUserService {
    private Map<String, String> cacheMap = new ConcurrentHashMap<>();

    public String getNameFromId(String userId) {
        String name = cacheMap.get(userId);
        if (name == null) {
            name = getNameFromDb(userId);
            cacheMap.put(userId, name);
        }
        return name;
    }
}
|
执行后从输出可以观察到只有第一次调用访问 DB,后面都是直接从缓存获取
db query: I0001
result: I0001 -> Name_I0001
result: I0001 -> Name_I0001
result: I0001 -> Name_I0001
|
那么,这个方案存在什么不足呢?
- 侵入性高。业务代码与缓存逻辑耦合在一起,不利于后续维护。
- 不能灵活扩展,比如某类热点用户 id 才缓存,其他不缓存。
- 绑死 ConcurrentHashMap,无法随意切换其他更优秀的缓存实现,比如 ehcache/redis 等。
- 缺乏自动刷新、过期淘汰等现代缓存特征。
那么,spring 是怎么做的呢?
spring 缓存
相比之前侵入式的方案,spring 采用的是声明式缓存,缓存逻辑完全脱离业务代码。我们要做的只是在方法上面增加一个注解@Cacheable
@Component
public class SpringCacheUserService extends AbstractUserService {
    @Override
    @Cacheable("SpringCache")
    public String getNameFromId(String userId) {
        return getNameFromDb(userId);
    }
}
|
运行后好像没效果,那是因为我们还没开启缓存。在程序入口添加一个注解@EnableCaching:
@SpringBootApplication
@EnableCaching
public class TestCacheApp {
}
|
再次运行就可以观察到缓存生效了
如果要实现 K 开头的用户 id 才缓存,怎么做呢?很简单,修改下注解,使用SPEL声明条件即可:
@Cacheable(cacheNames="SpringCache", condition="#userId.startsWith('K')")
|
我们简单分析下原理。
原始调用链:

spring 通过 AOP,在调用者和目标类中间插入代理类,拦截方法调用,实现缓存逻辑:

在这个设计下,应用层统一使用@Cacheable,而后端的缓存实现就可以灵活扩展,还能自由切换、组合各种优秀的缓存方案,比如 ehcache/guava/caffeine/redis。
逐步扩展
支持过期时间
spring 默认使用ConcurrentHashMap实现缓存,因此是不支持过期时间的,我们将其换成Caffeine。
添加依赖:
implementation 'org.springframework.boot:spring-boot-starter-cache'
implementation 'com.github.ben-manes.caffeine:caffeine:2.7.0'
|
在 application.yml 添加配置,设置缓存 2 秒过期:
spring.cache.caffeine.spec: expireAfterWrite=2s
|
添加测试方法,中间插入一个 sleep 休眠 2.2 秒:
private void testExpire(UserService userSvc, String userId) {
String name;
name = userSvc.getNameFromId(userId);
log.info("result: {} -> {}", userId, name);
name = userSvc.getNameFromId(userId);
log.info("result: {} -> {}", userId, name);
try {
Thread.sleep(2200);
} catch (InterruptedException e) {
throw new RuntimeException(e);
}
name = userSvc.getNameFromId(userId);
log.info("result: {} -> {}", userId, name);
name = userSvc.getNameFromId(userId);
log.info("result: {} -> {}", userId, name);
}
|
执行结果可以观察到 sleep 之后,缓存过期失效,重新查询 DB:
db query: I0001
result: I0001 -> Name_I0001
result: I0001 -> Name_I0001
db query: I0001
result: I0001 -> Name_I0001
result: I0001 -> Name_I0001
|
这个方案下缓存过期时间是全局性的,不支持不同类型的缓存单独配置不同的缓存过期时间。比如普通参数表可以 1 小时后过期,但是关键参数表却必须控制在 1 分钟内过期,如何实现呢?
精细控制过期时间
我们可以从注解着手,在缓存名称后面追加过期时间,变成:
@Cacheable(cacheNames="SpringCache,2")
|
新增一个CacheManager,重写父类方法createCaffeineCache,在里面处理缓存名称:
@Component
public class ExtCacheManager extends CaffeineCacheManager {
@Override
protected Cache createCaffeineCache(String name) {
String[] items = name.split(",");
String cacheName = items[0];
long cacheTime = 60;
if (items.length >= 2) {
cacheTime = Long.parseLong(items[1]);
}
com.github.benmanes.caffeine.cache.Cache<Object, Object> nativeCache =
Caffeine.newBuilder()
.expireAfterWrite(cacheTime, TimeUnit.SECONDS)
.build();
return new CaffeineCache(cacheName, nativeCache);
}
}
|
执行后从输出可以观察到此时缓存过期时间可以精细控制了。
过期处理策略
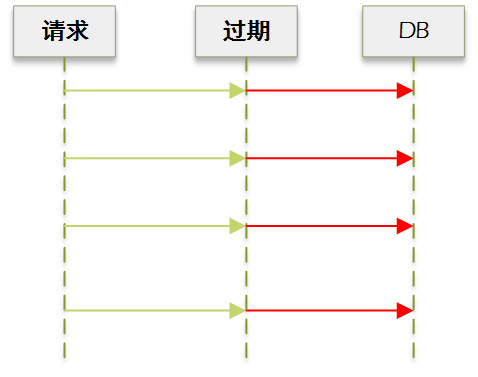
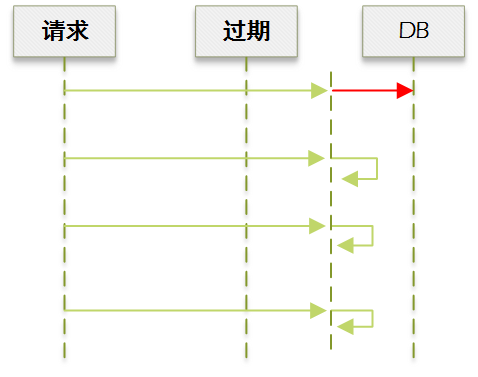
到了这里,我们需要暂时停下来,讨论下缓存过期的处理策略。
当缓存过期后,如果不加以处理,直接在当前请求更新缓存,就会导致多个并发请求瞬间穿透到 DB:
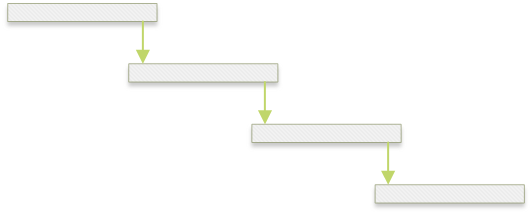
一种做法是判断到过期的时候加锁,抢占成功的就去 DB 刷新缓存,其他请求则等待:
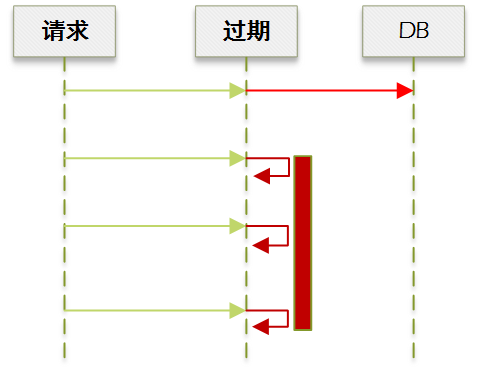
从上图可以看到,这样会造成请求瞬间卡顿。
我们改进下,未争抢到锁的请求不等待,而是直接使用旧值:
乍看之下没问题,但是仔细想想,如果一直没请求进来,在缓存过期很久之后再出现这个场景,此时取到的旧值已经严重过期,再直接使用可能会引发问题:
先总结下前面的需求,我们要尽可能做到:
- 不并行更新缓存,否则会冲击到 DB;
- 不产生锁等待,否则会导致瞬间卡顿;
- 不使用过期缓存值,否则会影响到业务处理;
这几点按重要性排序应该是3 > 1 > 2,综合几个策略,我们可以:
- 缓存
即将过期,1 个请求负责刷新缓存,其他请求则使用缓存值;
- 缓存
已经过期,1 个请求负责刷新缓存,其他请求则锁等待;


此时的缓存有效时间会不断的向前滚动,只需要 1 个请求负责更新缓存,其他请求直接使用缓存值:
实现提前刷新
当 caffeine 判断到需要刷新的时候(预设的刷新时间或过期时间到达),就会主动调用我们实现的 CacheLoader:
public interface CacheLoader<K, V> {
    V load (K key) throws Exception;
}
|
但是这个接口方法只有一个key参数,我们怎么实现刷新呢?
从前面的这个图可以看到,缓存模块并不知道值来源于 DB 还是哪里,刷新的唯一途径就是调用目标方法。但是目标方法上面只有一个@Cacheable注解而已,我们怎么获取到相关信息呢?
spring 给我们提供的方案是注解上面的keyGenerator参数,每次缓存操作的时候,spring 都会调用这个接口获取到 key:
@FunctionalInterface
public interface KeyGenerator {
	Object generate(Object target, Method method, Object... params);
}
|
我们可以在这上面做文章,使用自定义 key,将目标方法保存起来,然后提供一个 invoke 方法给 CacheLoader 调用。另外,我们还需要实现equals/hashCode/toString等 key 比较时要用到的基础方法。
public class ExtKey {
private final Object target;
private final Method method;
private final Object[] params;
private final int hashCode;
public ExtKey(Object target, Method method, Object... params) {
this.target = target;
this.method = method;
this.params = new Object[params.length];
System.arraycopy(params, 0, this.params, 0, params.length);
this.hashCode = Arrays.deepHashCode(this.params);
}
public Object invoke() throws Exception {
return this.method.invoke(target, params);
}
@Override
public boolean equals(Object other) {
return (this == other ||
(other instanceof ExtKey && Arrays.deepEquals(this.params, ((ExtKey) other).params)));
}
@Override
public final int hashCode() {
return this.hashCode;
}
@Override
public String toString() {
return getClass().getSimpleName() + " [" + StringUtils.arrayToCommaDelimitedString(this.params) + "]";
}
}
|
KeyGenerator 直接返回 ExtKey 即可:
@Component("ExtKeyGenerator")
public class ExtKeyGenerator implements KeyGenerator {
    @Override
    public Object generate(Object target, Method method, Object... params) {
        return new ExtKey(target, method, params);
    }
}
|
在注解里面添加刷新时间(-0.5 即提前 0.5 秒刷新)及 KeyGenerator 信息:
@Cacheable(cacheNames="SpringCache,1,-0.5",
    keyGenerator="ExtKeyGenerator")
|
然后在缓存初始化里面添加 CacheLoader:
@Component
public class ExtCacheManager extends CaffeineCacheManager {
private Logger log = LoggerFactory.getLogger(TestCacheApp.class);
@Override
protected Cache createCaffeineCache(String name) {
String[] items = name.split(",");
String cacheName = items[0];
long cacheTime = 60;
long refreshTime = 0;
if (items.length >= 2) {
cacheTime = (long) (1000 * Float.parseFloat(items[1]));
}
if (items.length >= 3) {
refreshTime = cacheTime + (long) (1000 * Float.parseFloat(items[2]));
}
CacheLoader<Object, Object> loader = new CacheLoader<Object, Object>() {
@Override
public @Nullable Object load(@NonNull Object key) throws Exception {
log.info("refresh cache: {}", key);
ExtKey extKey = (ExtKey) key;
return extKey.invoke();
}
};
Caffeine<Object, Object> builder = Caffeine.newBuilder()
.expireAfterWrite(cacheTime, TimeUnit.MILLISECONDS);
if (refreshTime > 0) {
builder.refreshAfterWrite(refreshTime, TimeUnit.MILLISECONDS)
.executor(Runnable::run);
}
return new CaffeineCache(cacheName, builder.build(loader));
}
}
|
对于一些系统,如果加载方法不能运行在公共线程池ForkJoinPool.commonPool(),而必须在缓存请求线程执行,则需要显式指定 executor(Runnable::run)。
接下来测试下效果,首先新建线程类:
private static class VirtualUser extends Thread {
private final UserService userSvc;
private final String userId;
private final CountDownLatch latch;
public volatile boolean stopFlag = false;
public int counter = 0;
public VirtualUser(UserService userSvc, String userId, CountDownLatch latch) {
this.userSvc = userSvc;
this.userId = userId;
this.latch = latch;
}
@Override
public void run() {
try {
latch.await();
while (true) {
String name = userSvc.getNameFromId(userId);
counter++;
Thread.sleep(0);
if (stopFlag) {
break;
}
}
}
catch (InterruptedException e) {
throw new RuntimeException(e);
}
}
}
|
然后新建一个多线程测试方法:
private void testMultiThread(UserService userSvc, String userId) throws Exception {
final int VUSER_COUNT = 200;
log.info("create thread ...");
CountDownLatch latch = new CountDownLatch(1);
List<VirtualUser> threadList = new ArrayList<>();
for (int i = 0; i < VUSER_COUNT; i++) {
VirtualUser thread = new VirtualUser(userSvc, userId, latch);
thread.start();
threadList.add(thread);
}
log.info("go ...");
latch.countDown();
Thread.sleep(10 * 1000);
log.info("stop thread ...");
for (VirtualUser thread : threadList) {
thread.stopFlag = true;
}
int totalCount = 0;
for (VirtualUser thread : threadList) {
thread.join();
totalCount += thread.counter;
}
log.info("all done, counter: {}", totalCount);
}
|
通过比较参数cacheNames="SpringCache,1,-0.5"和cacheNames="SpringCache,1"对应的执行效果,可以观察到提前刷新是比过期刷新效率高的,并且随着并发数和刷新耗时的上升,两者的差距会越来越明显。
集中配置
缓存名称、大小、过期时间、刷新时间等参数目前都是直接放在注解上面,不利于管理维护,我们可以将其集中起来。
在 application.yml 添加配置,key 为类名,value 为容量,过期时间,刷新时间:
ext.cache:
  cacheItemMap:
    SpringCacheUserService: 100,1,-0.5
|
配置对应的 bean:
@Component
@ConfigurationProperties("ext.cache")
public class CacheConfig {
private Map<String, String> cacheItemMap;
public void setCacheItemMap(Map<String, String> cacheItemMap) {
this.cacheItemMap = cacheItemMap;
}
public CacheItem getCacheItem(String cacheName) {
String cfgStr = cacheItemMap.get(cacheName);
String[] items = cfgStr.split(",");
long maxSize = Long.parseLong(items[0]);
long cacheTime = 1000 * (long) Float.parseFloat(items[1]);
long refreshTime = 1000 * (long) Float.parseFloat(items[2]);
if (refreshTime != 0) {
refreshTime += cacheTime;
}
return new CacheItem(maxSize, cacheTime, refreshTime);
}
}
|
public class CacheItem {
    private final long maxSize;
    private final long cacheTime;
    private final long refreshTime;

    public CacheItem(long maxSize, long cacheTime, long refreshTime) {
        this.maxSize = maxSize;
        this.cacheTime = cacheTime;
        this.refreshTime = refreshTime;
    }

    public long getMaxSize() {
        return maxSize;
    }

    public long getCacheTime() {
        return cacheTime;
    }

    public long getRefreshTime() {
        return refreshTime;
    }
}
|
修改下CacheManager读取配置:
@Component
public class ExtCacheManager extends CaffeineCacheManager {
private Logger log = LoggerFactory.getLogger(TestCacheApp.class);
@Autowired
private CacheConfig cacheConfig;
@Override
protected Cache createCaffeineCache(String name) {
CacheItem cacheItem = cacheConfig.getCacheItem(name);
long maxSize = cacheItem.getMaxSize();
long cacheTime = cacheItem.getCacheTime();
long refreshTime = cacheItem.getRefreshTime();
CacheLoader<Object, Object> loader = new CacheLoader<Object, Object>() {
@Override
public @Nullable Object load(@NonNull Object key) throws Exception {
log.info("refresh cache: {}", key);
ExtKey extKey = (ExtKey) key;
return extKey.invoke();
}
};
Caffeine<Object, Object> builder = Caffeine.newBuilder()
.expireAfterWrite(cacheTime, TimeUnit.MILLISECONDS);
if (maxSize > 0) {
builder.maximumSize(maxSize);
}
if (refreshTime > 0) {
builder.refreshAfterWrite(refreshTime, TimeUnit.MILLISECONDS)
.executor(Runnable::run);
}
return new CaffeineCache(name, builder.build(loader));
}
}
|
原来的缓存名称都是直接写在注解上面的,如果要动态生成,需要拓展CacheResolver:
@FunctionalInterface
public interface CacheResolver {
	Collection<? extends Cache> resolveCaches(CacheOperationInvocationContext<?> context);
}
|
我们只需要实现AbstractCacheResolver的getCacheNames即可:
@Component("ExtCacheResolver")
public class ExtCacheResolver extends AbstractCacheResolver {
public ExtCacheResolver(CacheManager cacheManager) {
super(cacheManager);
}
@Override
protected Collection<String> getCacheNames(CacheOperationInvocationContext<?> context) {
String cacheName = context.getTarget().getClass().getSimpleName();
return Arrays.asList(cacheName);
}
}
|
在注解里面引用CacheResolver:
@Cacheable(keyGenerator="ExtKeyGenerator",
        cacheResolver="ExtCacheResolver")
|
每个使用缓存的地方都要这样注解,对用户太不友好了。我们可以利用 spring 的注解组合功能:
@Target({
    ElementType.METHOD,
})
@Retention(RetentionPolicy.RUNTIME)
@Inherited
@Documented
@Cacheable(keyGenerator="ExtKeyGenerator",
        cacheResolver="ExtCacheResolver")
public @interface ExtCacheable {

}
|
直接引用这个注解:
@ExtCacheable
public String getNameFromId(String userId) {
    return getNameFromDb(userId);
}
|
相比原来冗长的注解,简洁不少:
@Cacheable(cacheNames="SpringCache,1,-0.5", keyGenerator="ExtKeyGenerator")
->
@ExtCacheable
|
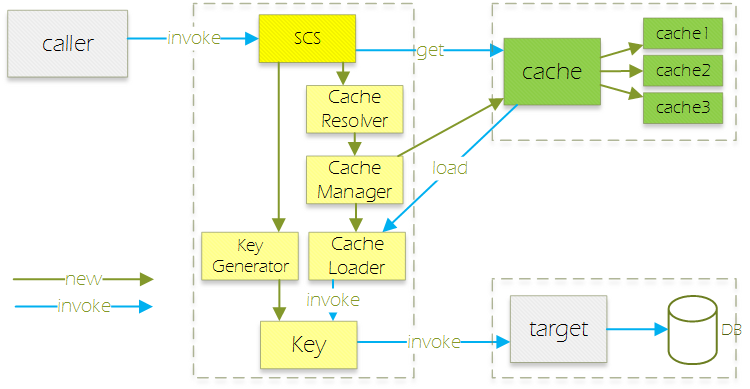
模块关系
看到这里,头脑是不是有点蒙圈了?
我们整理一下各个模块之间的关系:
发散思考
全程下来,很深的感受是 AOP 不愧为 spring 的两大特征之一(另外一个是 DI),而 SCS 作为协调者,做到了 caller/target/cache 三者之间的平滑处理。
那么,我们还可以用 SCS 做什么?
- 切换本地缓存 caffeine 为远程缓存 redis;
- 组合 caffeine 和 redis,少量、时效性不高的参数放在 caffeine(分布式、速度快),大量、时效性高的数据放在 redis(节省内存、更新方便);
demo 下载链接:[ testcache.7z]